Origin Of The Pillsbury Plan
May 26, 2026
What exactly is the Pillsbury Plan?
It's when you have the following setup: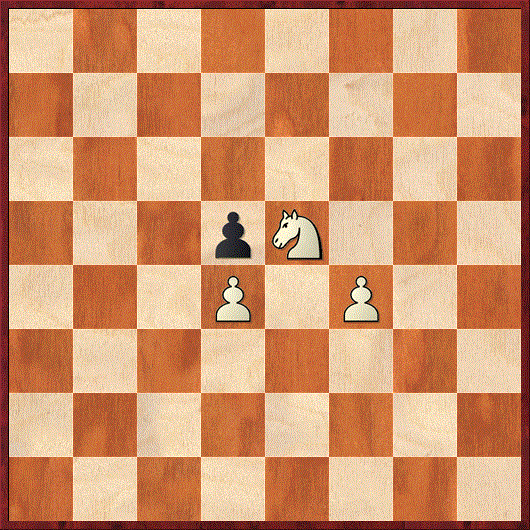
Here's how it looks with colours reversed: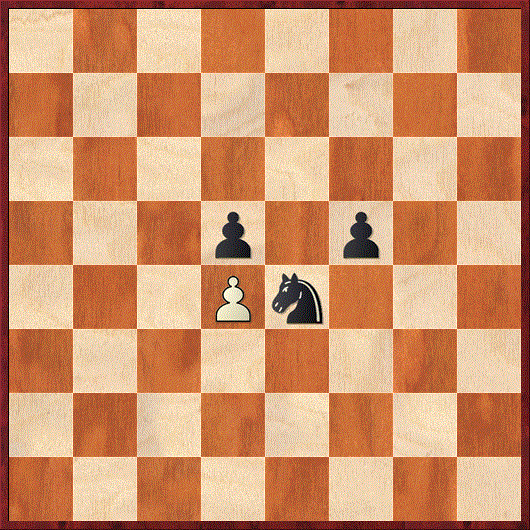
This is quite a powerful attacking setup, as the knight is 'anchored' in place by pawns. Furthermore, these pawns provide valuable space to serve as the foundation for a strong enemy on the enemy king, castled short.
The game that really brought players' attention to the strength of this setup is the famous game Pillsbury-Marco, Paris 1900.
Here is a picture of Harry Nelson Pillsbury, one of the greatest chess players of the late 19th and early 20th century:
For this post, I have annotated the game below. Click here to follow along on an interactive chess board.
For a challenge, follow the game in your head without a board as much as possible, for it will greatly improve your visualization skills.
I have put important coaching questions in bold.
1.d4 d5 2.c4 e6
Queen's Gambit Declined - the most 'classical' reply to 1.d4.
3.Nc3 Nf6 4.Bg5
Nowadays The Exchange Variation with 4.cxd5, or the flexible 4.Nf3 (intending to meet 4...Be7 with 5.Bf4) are considered more critical.
4...Be7 5.e3 0-0 6.Nf3 b6
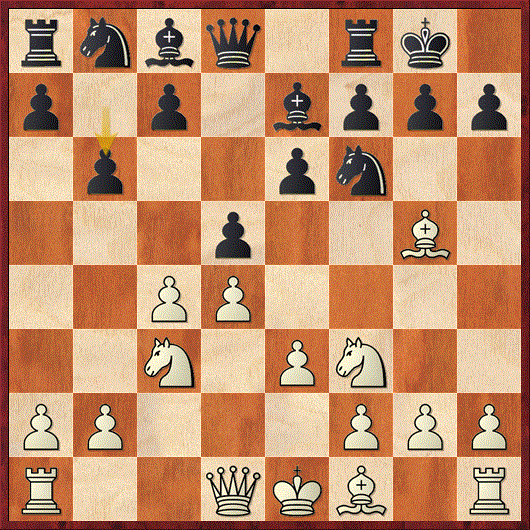
What do you think of this move?
The players have continued in a standard fashion, with Black following the classical approach of castling kingside and then fianchettoing his queen's bishop. Modern players insert 6...h6 7.Bh4 and only then play 7...b6, as the extra move ...h6 is useful both in providing luft for the Black king (against a later back-rank mate) and also avoids a later Bd3/Qc2 battery against the h7-pawn.
7.Bd3 Bb7 8.cxd5
White should have exchanged on d5 a move earlier, but better late than never!
8...exd5
This recapture is the source of Black's initial problems, as the b7-bishop now proves very passive behind the d5-pawn. Correct was 8...Nxd5!, keeping the long diagonal open for the fianchettoed bishop, and then ...Nd7/...c5 in some order would free Black's position.
9.Ne5
White immediately jumps in with the knight to set up the Pillsbury Plan. However, it would have been more flexible to build up this idea with the developing moves 9.0-0 Nbd7 10.Qc2, with an edge.
9...Nbd7 10.f4
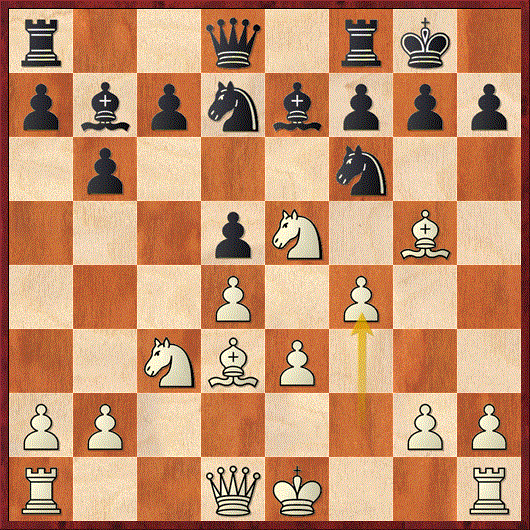
How would you defend if you were Black?
This is an important position, since if White is able to keep such a strong knight on e5 throughout the game without punishment, Black will be very passive and facing a strong kingside attack.
10...c5
This is a reasonable move, but it's important to note the main disadvantage of 10.f4 - the e4-square is now a potential outpost for Black's pieces, and the e3-pawn is backward. Black could have exploited this by playing 10...Ne4, which should equalize, though the move in the game is also good if followed correctly.
11.0-0 c4
But this is a clear mistake. By closing the centre and releasing the tension against the d4-pawn, White now has a free hand to attack on the kingside, without interference.
The thematic approach in such positions is, once again, to plant the knight on e4, with 11...cxd4 12.exd4 Ne4 being one way to do so and equalize.
It may be even more precise to insert 11...h6 12.Bh4 first, and only then play 12...cxd4 13.exd4 Ne4 14.Bxe7 Qxe7. Black is fine here, as trading on e4 would give Black a passed pawn on e4, open up the b7-bishop, and make the d4-pawn a weakness on the newly opened d-file.
12.Bc2 a6
The plan of ...b5-b4 is thematic in such structures, but here it proves way too slow - normally White's bishop needs to be on c1 for this to have a real chance of working for Black.
13.Qf3
A powerful move, covering e4 and preparing to swing the queen into the attack via. h3.
13...b5 14.Qh3 g6
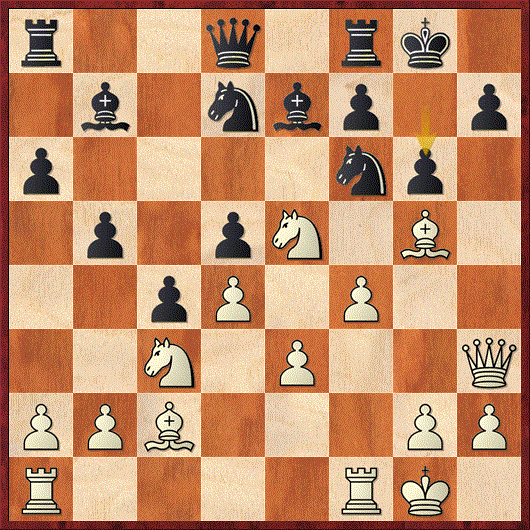
How should White proceed with his kingside attack now?
Black has clearly lost his sense of danger - 13...Re8 was indicated before, to at least have ...Nf8 to cover the king. The result is that Black has been forced to weaken his king's pawn cover with ...g6, and this creates a hook that we can exploit to force open files and diagonals to the king.
15.f5
A very powerful move, though other moves, such as 15.Qh4 first, to threaten Nxd7, are also winning for White.
15...b4
Black tries to create counterplay on the queenside, but White's attack is much, much faster.
16.fxg6 hxg6 17.Qh4
A lot of moves win here (including 17.Nxg6, which is the first move that came to my mind). Black's problem is that White's attackers are much more active than Black's defenders, and Black's dark squares on the kingside are also very weak.
17...bxc3 18.Nxd7 Qxd7
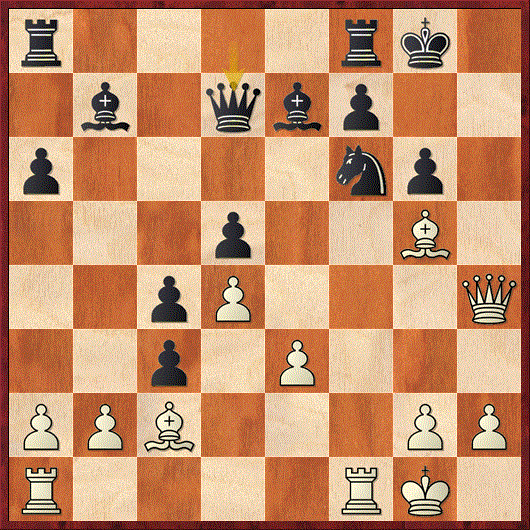
Which capture would you play here as White?
Now White found a very nice way to crown his attack.
19.Rxf6
A great move, as 19...Bxf6 20.Bxf6 leads to mate on h8, but otherwise White brings his final piece into the attack with Raf1.
19...a5 20.Raf1
White missed 20.Bxg6! which forces mate, but bringing the final piece into the attack (a good principle for attacking like a Grandmaster) is also a good idea.
20...Ra6
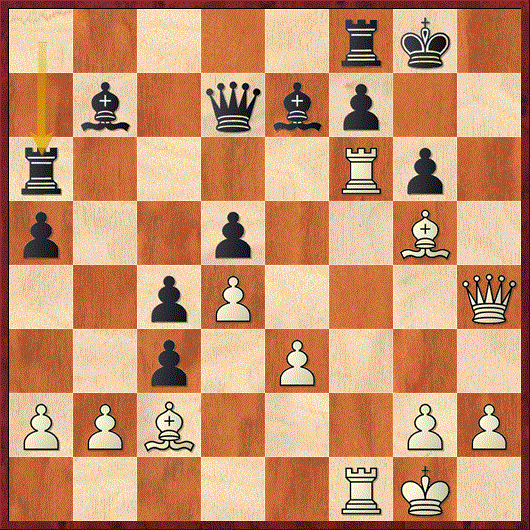
Do you see the combination that Pillsbury played here to force checkmate?
To be fair, many moves win for White at this point, but it's the next moves that crown this game as one of the most brilliant of the late 19th/early 20th century.
21.Bxg6
A great move, shattering Black's pawn cover and threatening Qh7 mate, so Black's reply is forced.
21...fxg6 22.Rxf8 Bxf8
Now there's only one move that makes sense of White's previous play.
23.Rxf8
A great move - now the power of the queen and opposite coloured bishops (for the side with the initiative) come into play.
23...Kxf8 24.Qh8 Kf7 25.Qh7
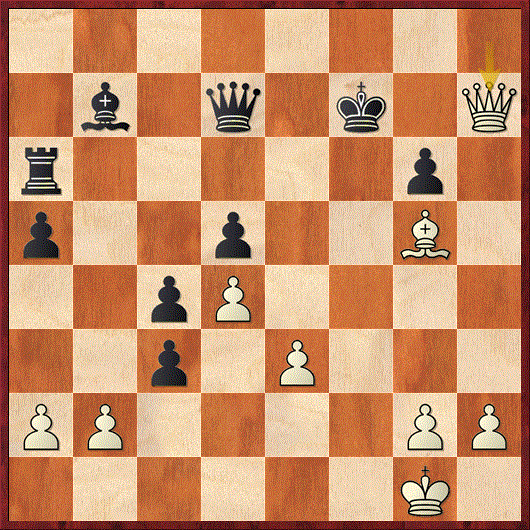
Now the point of Pillsbury's combination is clear - Black gets mated after 25...Ke6 26.Qxg6 or 25...Ke8 26.Qg8.
In the game, Black played 25...Kf8 26.Qxd7 and then resigned, as Bh6 and Qg7 mates next.
Did you love this game by Pillsbury?
Studying these classic games allows us to understand exactly what we are aiming for in these types of positions, as Black clearly didn't defend in the best way, and we saw all of White's important ideas employed without interference.
This lesson is actually just a sample of a much larger lesson I've recorded as part of my Grandmasterclass, where I show you how to execute the Pillsbury Plan effectively with either colour and play these types of positions like a Grandmaster.
Click here to discover the secrets of this dangerous strategic plan, and much more, for yourself.
See you on the inside!
Get the unfair advantage over your next chess opponents!
Join our mailing list to receive daily chess improvement emails and free training videos from GM Max!
We hate SPAM. We will never sell your information, for any reason.