How To Know If Your Attack On The King Will Work - The 4 Attacking Advantages
May 30, 2026
So you want to know what makes an attack on the king successful?
I got you covered.
I'm GM Max Illingworth, and my students have been loving my framework 'The 4 Attacking Advantages' for over a decade.
In fact, I cover it in my course 'Attacking The King' in case you want to master the important skill of attacking chess, and putting pressure on the opponent until they crack.
If you have at least two of these four advantages in a position, there's a pretty strong chance your attack will succeed!
If you want to really get the most out of this post, replicate the way I teach it in my private lessons, and write down what you think the 4 Attacking Advantages are. Then compare your list to mine - you'll notice how much better you remember it and apply it after thinking about it yourself.
Let's go through them one at a time.
1. More Attackers Than Defenders
This is one of the easier ones - the more attacking 'force' we have relative to the opponent's defending pieces, the more likely we can overpower them for the checkmate, right?
Here's our first example: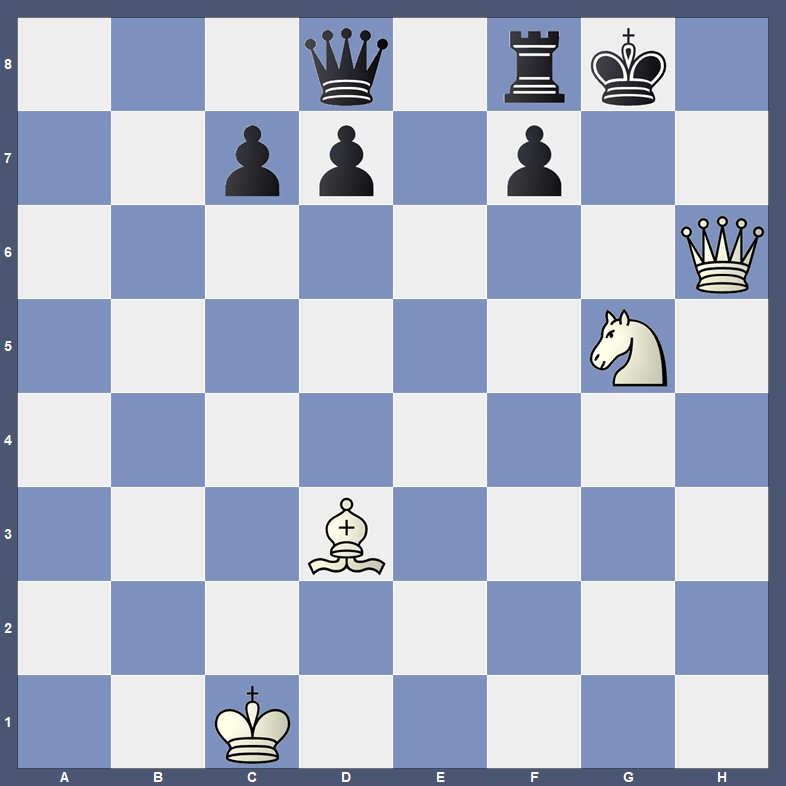
It's Black to move. This is a fine demonstration of what I like to call the 'GothamChess Attacking Principle' - if you have two more attackers than the opponent has defenders, your attack is very likely to succeed.
Indeed, Black is getting mated by force, as the only two moves that stop Qh7 being checkmate are 1...Re8 and 1...Qxg5. But 1...Re8 opens the door for 2.Qh7 Kf8 3.Qxf7#, while 1...Qxg5 (remember, it's check!) 2.Qxg5 wins the queen and soon mates anyway after 2...Kh8 3.Qh6 Kg8 4.Qh7#.
Enjoying the blog so far? Subscribe to my email list for more of my Grandmaster chess insights on how to make your chess improvement simple again!
Now for the second attacking advantage.
2. Weaknesses Around The King
These weaknesses can take many forms - weak pawns, weak squares, open lines and diagonals, you name it.
But the easiest way to understand it is by looking at this position: 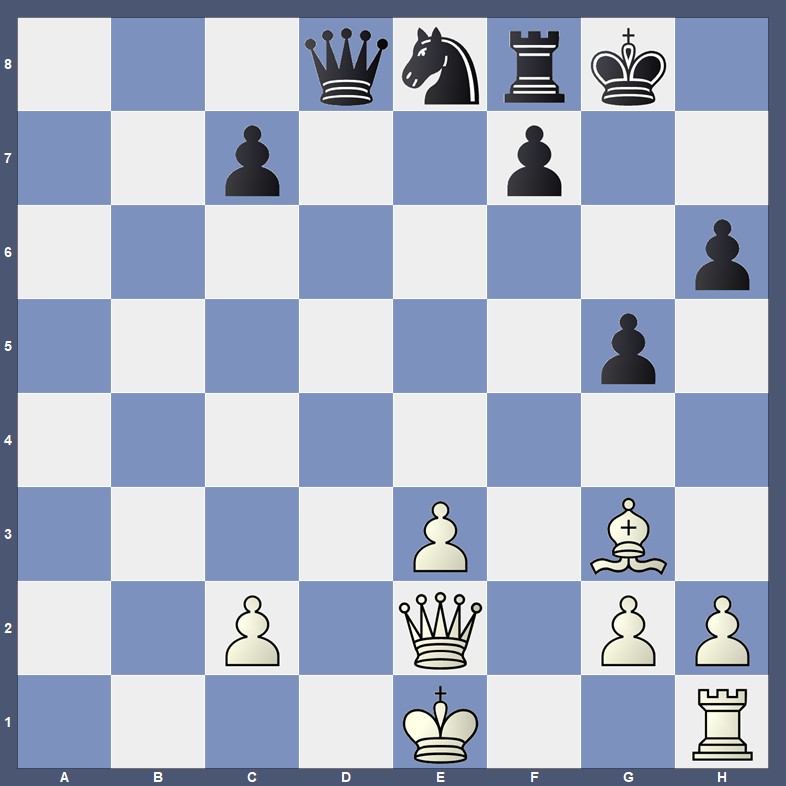
(White to move)
White has a long-term advantage here, because of Black's earlier ...g5? pawn push, which has permanently weakened Black's king. We don't even need to necessarily punish it immediately - as long as least a queen and rook each remain on the board, Black's king will remain very unsafe in the long-term.
There are several ways to try and exploit Black's open king, such as with 1.h4, to open lines and bring our rook into the attack. Or 1.Qh5, attacking the now undefended h6-pawn. But even a simple 'improving' move like 1.0-0, or a creative improvement like 1.Be5, demonstrates how Black has a much harder time defending their king against our attack without the 'shelter' of their pawns.
As the Swedish GM Ulf Andersson liked to say - think twice before pushing a pawn, because it can never move back! 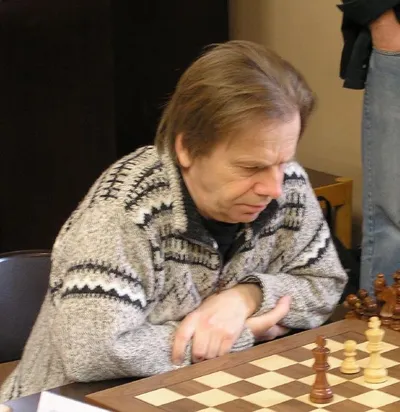
If you find principles like what I'm sharing here valuable, contact me at illingworthchess@gmail.com to discuss private coaching. Get in soon as I only have a few slots left for private students!
The third attacking advantage is one more 'strategically inclined' students of mine often forget about, when I ask them to name the 4 Attacking Advantages.
3. Initiative (Flow Of Threats)
Most of my students below 1500, when I ask them to define the initiative in chess in our first private lesson, struggle to clearly define it. They have a general idea of it, but aren't quite sure how to articulate it in words.
I liken the initiative to possessing the ball in soccer, because you need to possess the ball to score a goal, right? (Unless the other team scores an own goal, which would be the 'unforced blunder' in chess, but you can't always count on that!)
The technical definition of the initiative is - when you have a FLOW of threats that the opponent can't ignore. That's very different to making a one-move threat, and then having no real follow-up after the opponent defends against our attack. (That is why I constantly remind my students of the question - before making a threat, ask yourself - what's my follow-up after my opponent defends against my threat?)
Enough talk, it's time for you to put these ideas in action. What's the sequence for White, to move, in the diagram below? 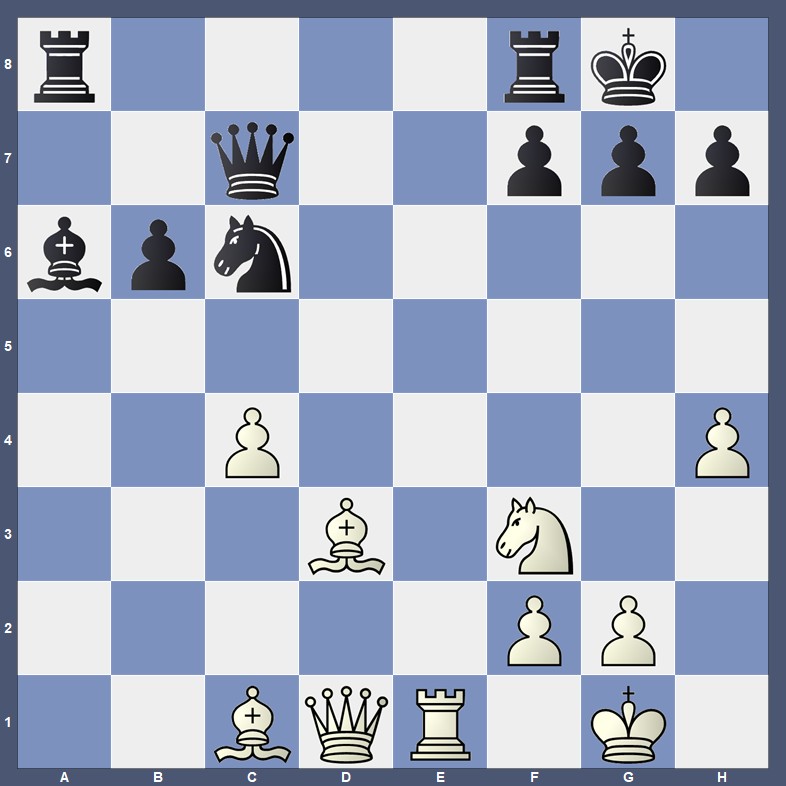
Even though Black is up an exchange, they are losing because we can take the initiative - setting up a flow of threats that they are unable to stop, making their extra exchange...immaterial.
After 1.Bxh7! Kxh7 2.Ng5, Black has only bad options:
A) 2...Kg8 3.Qh5 forces mate after 3...Rfe8 4.Qh7 Kf8 5.Qh8#. Now we see why it was important for the pawn to be on c4, as otherwise 3...Bd3! would defend the key h7-square and turn the tables on us.
B) 2...Kh6 3.Ne6 discovering an attack on the queen is simple enough. Remember - an attack on the king doesn't have to lead to checkmate right away to be successful!
C) 2...Kg6 3.h5 Kf6 4.Qf3 also sees Black's king get checkmated.
Chess is not checkers, and Black could try a defence such as 1...Kh8. But then 2.Ng5 and Qh5 is still very strong, as the attempt to trap in our bishop with 2...g6 fails to 3.Bb2 f6 4.Bxg6. Black is unable to take the g5-knight due to the fresh pin on the long diagonal. And we have already seen before how, when we have 2 or more attackers than they have defenders around their king, and they have weaknesses around the king, the end is nigh for Black's king.
The fourth attacking advantage is the hardest one to figure out - I was already a strong International Master by the time I appreciated it, so you're doing extremely well if you figured this one out! 
4. Space Advantage Around The King
Why is a space advantage around the king valuable in making our attack succeed?
Take this position as an example: 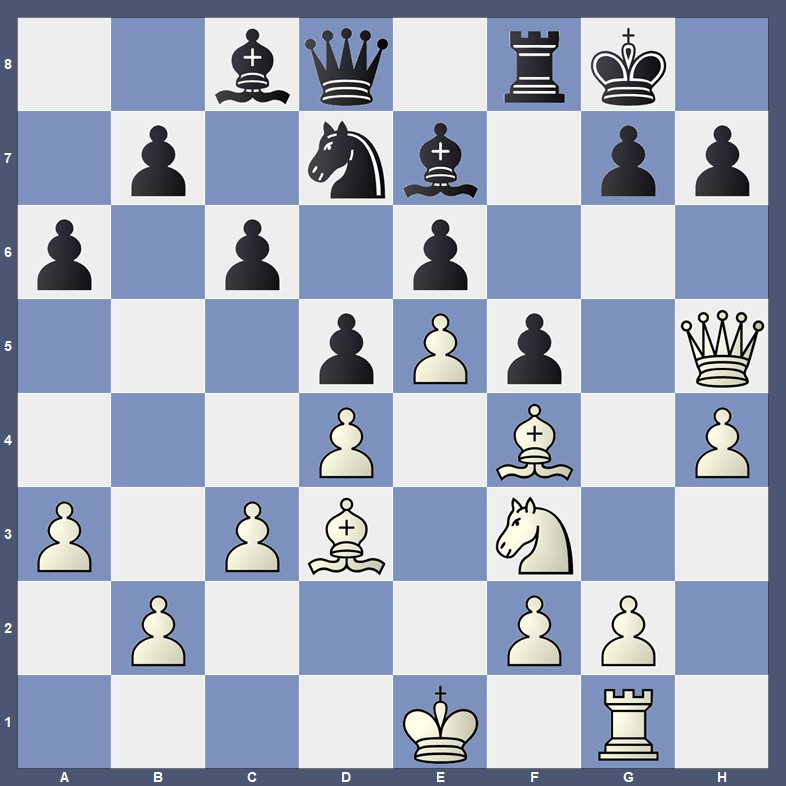
If you've ever struggled to convert winning positions in the past, I'd recommend paying attention to this one.
Notice how, with our permanent space advantage (the pawn on e5 cannot be challenged by the d5- or f5-pawn), Black is unable to bring their pieces to the defence of their king properly, such as with ...Nf6 (or even ...Bf6/...Rf6, for that matter).
This means that our attackers are much more effective than their defenders, and with the move of 1.g4, we can use the pawn 'hook' on f5 to force open lines to the opponent's king. (I cover 'hooks' in much more detail in my Attacking The King course)
Now if Black plays 1...g6, I had originally calculated the epic idea of 2.Qh6 Rf7 3.gxf5 Bf8 4.fxg6!!, sacrificing the queen but obtaining a crushing attack on the dark squares after 4...Bxh6 5.gxf7 Kxf7 6.Bxh6 followed by Rg7 - a fine demonstration of how the most valuable pieces aren't the best defenders, because the queen doesn't want to give its life for a mere rook and bishop!
But then I noticed we could even play 2.gxf5 first, using the absolute pin of the rook against their pawn to tactically protect our queen. The difference becomes evident after 2...exf5 3.Qh6 Rf7 4.e6, forking rook and knight, while other defences like 3...Qe8 4.h5 see us decisively crash through on g6. Note how much more active all of White's pieces are than Black's in this example - that's the power of the space advantage, especially when lots of minor pieces remain on the board. 
From a defensive perspective, Black could exchange the queens with 1...Qe8. (If you want me to cover defence more deeply in a future post, let me know in the comments below!)
But after 2.Qxe8 Rxe8 3.gxf5 exf5 4.Bxf5, we win a pawn, as the attempt to 'tactic' us back with 4...Nxe5 (hoping for 5.Bxc8?? Nxf3) is parried by 5.Bxe5 Bxf5 6.Rxg7 Kf8 7.Ng5, continuing our attack into the endgame! After 7...Bxg5 8.Rxg5 Bb1 9.Kd2, we have a decisive advantage in the endgame. That's because, even though it's an opposite-coloured bishops endgame, we still have the rooks on the board! And not only do we have the far better bishop, we can also push our passed f-pawn to really tie Black up before moving in for the kill.
Summary/Conclusion
What were some of your favourite insights from this post?
If you need a refresher, the 4 attacking advantages we covered were:
1. More Attackers Than Defenders
2. Weaknesses Around The King
3. Having The Initiative (Flow Of Threats)
4. Space Advantage Around Their King
One of these advantages by itself typically won't be enough to have a winning attack.
But if you have 2 or more of these advantages at once, your attack on their king has a pretty strong chance of succeeding!
If you enjoyed this post, you can get the PGN file of this post for just $1 here.
As a bonus, I've included my full verbal explanations of one of my best attacking wins from my OTB career, against the current Australian no.1, Bobby Cheng. You'll understand my thought process as I was playing that game, and how I applied the 4 attacking advantages framework to score a critical victory on the way to winning the 2018 Australian Championship.
That's all for this post - see you next time!
And remember - you can get the early scoop on these posts and far more of my content by getting your free 'Anti-Blunder Blueprint' here. Because there's no reason to let silly blunders get in the way of your otherwise well-played games!
Get the unfair advantage over your next chess opponents!
Join our mailing list to receive daily chess improvement emails and free training videos from GM Max!
We hate SPAM. We will never sell your information, for any reason.